Monday, April 13, 2009

More Lighting!

We recently covered a few lighting aspects at a meeting and in a few discussions that seem to be causing confusion and are often not covered in basic lighting tutorials. We'll start with the big one.
  • The closer the light source is to the subject, the softer the light
  • The further the light source is from the subject, the harder the light
This is where the confusion comes in. At first thought, one would think that the closer the light the harder the light but this is untrue. Intensity(brightness) of the light is often confused with the quality(hard/soft). The quality of the light is determined by size of the light source in relation to the subject.
For example, the sun is the biggest light source but because it is so far away from us, the subjects, it casts hard light.
As the light source gets closer to the subject, the light will get brighter but it also becomes softer because the light source is getting larger in relation to the subject.

Now depending on the set up, when the light is further away there are more opportunities for it to be bounced and reflected which will soften it. For instance, if you're in a room with white walls and ceiling, when you pull back the light source it now has more areas to bounce off of and will have a softer quality.
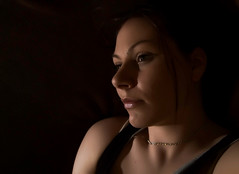
Hard Lighting

Softer Lighting


Here's the next catch, the distance of the light to the subject and distance from the subject to background affects light fall off. Say the subject is about 7' from the background and the light source is about 7' from the subject. The subject will be well lit as well as the background. Now if you move the light closer to the subject to soften it, the light will fall off quicker and your subject will be well lit bit the background will be underexposed. If this is what you're going for, no problems, but if for instance you have a white background you want to stay white it is. A modifier such as an umbrella or diffuser will help spread the light. Usually lighting the background separately will produce the best results.

I have a rad professor who puts what she calls Forever Facts into her power points; wonderful, I love them. So I'm going to steal from her and give a couple here, look for these in future post.

When using external lighting:
  • Aperture controls the flash exposure. The aperture size will dictate how much of the light from the flash will be let in the lens.
  • Shutter speed controls the ambient exposure. The slower the shutter speed the brighter the ambient light and vice versa.
Neither of these aspects are bad but knowing how they work and how to control them will give you the ability to light to produce the effect you desire and elevate a lot of frustration.

Friday, April 10, 2009

Backdrops,oy!

It's been a very long 3 weeks! I swear the busier you get the more you start thinking about retirement, no matter how far off it may be. So I was in a car accident about 3 weeks ago. Thankfully everyone was ok however I can't say as much for my car. Huge OT tip, ALWAYS get GAP insurance! It was the best $400 I ever spent. My car was totaled but happy endings prevail as I picked up my new Jetta on Saturday, yay!

Yes, there is a point coming I swear. So the hubby was feeling bad about having to get underway after the accident and leaving me to deal with the huge mess with the INS and car company so he went on a 'helpful' streak LOL. All was well till he decided to straighten up the studio... I have all cloth muslin backdrops, he folded them! So when I finally got some time to go to the studio I was so happy to see eveything clean and put away till I noticed all the backdrops missing. I found them very nicely folded. Apparently my hubby didn't realize you never fold these as it is insane trying to get the creases out. Three days later I think we're good. So here are a few tips for wrinkle free backdrops!

-Never fold them. If possible rolling them seems to work best. I usually use the center bars from the stand to roll them. If you can't roll them just very loosely fold it. Some say balling it up works because it easier and quicker to remove wrinkles than creases. I don't know about the balling but removing wrinkles is definitely easier.

-A great way to get the wrinkles out is to get a good spray bottle and fill it with hot water. Hang the backdrop and lightly spray it from top to bottom. Large cloth drops a pretty heavy and this works well with them. You'll see the wrinkles going as you spay and more as it dries.

-For tough wrinkles and deep creases you can't go wrong with a steamer. Same as with the spray bottle, hang it and go lightly from top to bottom.

-Most importantly, keep good intentioned unknowing spouses out! DH came in while I was steaming away and said so innocently, "what happened to those"...

Till zee next time!